GUIDE XYFX Mode
MPC XYFX mode: the complete guide to the touchscreen effect pad
Touch the screen and a delay's time and feedback bend together under one finger. That's the pitch, and it's real, but the part that trips people up isn't the performance side, it's the plumbing underneath it: XYFX isn't a mode layered on top of your existing effects, it IS an effect, one that has to be loaded into an insert slot like anything else, which means it competes with your other three slots for the same track. Every field, the Location options, Latch, and the Attack/Release/Wet-Dry knobs, checked page by page against Akai's own manual.
The short version
Akai's manual opens the chapter with the plain pitch: XYFX turns the touchscreen into an XY pad where each axis controls one effect parameter, and moving a finger across it changes both values live. What the pitch doesn't lead with, and what this article does, is the one sentence buried two lines later that changes how you'd actually plan around it: the effect you're controlling acts like a single insert effect on the track, and XYFX is literally the name of that insert effect. You don't turn on a mode, you load a plugin called XYFX into one of your four insert slots, and then the touchscreen becomes its remote control.
SAM'S NOTE from the bench next door, because Dex made me put this in: I lost twenty minutes once wondering why my fourth insert slot wouldn't take a compressor. Scrolled up the chain and there it was, XYFX, sitting in slot two from a session two days earlier, quietly eating a slot I'd forgotten I loaded. It's not a hidden mode, it's furniture in the effects chain, and it stays there until you clear it like anything else.
The catch: XYFX is an insert effect, not a mode
This is worth stating twice because the chapter name invites the wrong mental model. Akai's own Effects overview chapter, a different part of the manual entirely from the XYFX chapter itself, confirms the same architecture from the other direction:
"There are three other modes that manage effects differently: The Sampler can use up to four insert effects, which are applied to the audio as you record it... Similarly, the Looper can use up to four insert effects... In XYFX Mode, the effects act like a single insert effect on that track. In fact, XYFX is the name of the insert effect you have to load to the track before you can use this mode."
Every location that takes insert effects, pads, keygroups, tracks, submixes, and outputs, is capped at four insert slots each. Load XYFX into a track that already has three other insert effects running and there's no room left; the manual's own instruction for that exact situation is to clear a slot first. Practically, that means XYFX competes for the same real estate as a compressor, an EQ, or a reverb send, it isn't a free overlay you can stack on top of whatever's already loaded.
Opening XYFX Mode
Two ways in, and the hardware-shortcut list is genuinely device-specific rather than one universal key:
"To enter XYFX Mode, do either of the following: Press Menu, and then tap XYFX. Press XYFX (MPC X), Shift and Next Seq/XYFX (MPC Live II, MPC One, MPC One G2), Shift and Edit/XYFX (MPC Key 61, MPC Key 37), or Shift and Arrange/XYFX (MPC Key 37 G2)."
Note the last item on that list: the Key 37 G2 gets its own shortcut, Shift and Arrange/XYFX, distinct from the plain Key 61 and Key 37's Shift and Edit/XYFX. That's not a typo carried over from a sibling device, both shortcuts are printed as genuinely different key combinations for genuinely different hardware, which is worth knowing if you're moving between a Key 37 and a Key 37 G2 and reaching for muscle memory.
The Location field: Track or a main output only
Once XYFX is loaded, the first field to set is where its effect actually applies, and the list of options is narrower than the general insert-effect system this site covers elsewhere:
"Use the XYFX Location field to select the signal to which the effects will be applied: the current track (Track) or a main output (a stereo pair of channels: Output 1/2 or Output 3/4)."
That's three options total, Track, Output 1/2, Output 3/4, and notably no submix option and no per-pad or per-keygroup option, even though the general Insert Effects system this site's own effects coverage describes supports pads, keygroups, submixes, and outputs as loading points alongside tracks. If the plan is to run XYFX on a submix bus rather than a single track or a whole main output pair, the field itself doesn't offer that option; Track and the two main output pairs are the entire list.
Using the pad: marker, color, Latch
With Location set, the touchscreen itself becomes the controller:
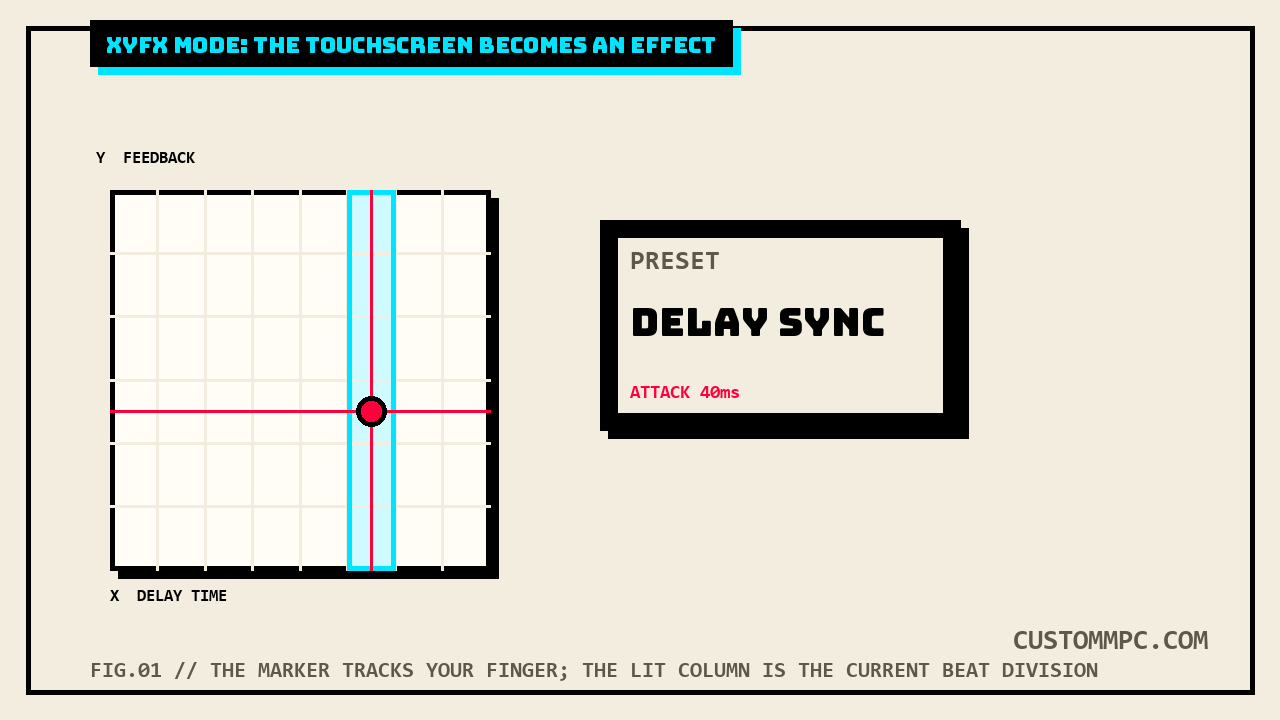
"Touch or move your finger on the gridded part of the screen. A marker will follow your finger to indicate the current position. The X axis is the horizontal axis, increasing in value as you move right. The Y axis is the vertical axis, increasing in value as you move up. Each axis is labeled with its assigned parameter. When an effect has a beat division parameter, the current division will be highlighted as an entire column. Effects are differently colored for easy visual distinction: beat-synchronized effects are blue, while manually controlled effects are green."
That color convention is a genuinely useful at-a-glance cue: glance at the pad and the color alone tells you whether the loaded effect is locked to the project tempo (blue, with a highlighted column marking the current division) or running free on manually controlled ranges (green). To hold a position without keeping a finger on the glass:
"While touching the XY pad, tap Latch in the lower-left corner to keep the marker on the XY pad even after you release it. The marker will remain there until you touch another part of the XY pad or until you tap Latch again."
Latch is what turns XYFX from a strictly hands-on, in-the-moment gesture into something closer to a fixed setting you can dial in once and walk away from, still adjustable at any time by touching the pad again.
Setup, Preset, and the three knobs
Two more fields round out the window before touching the pad itself. Setup toggles a panel of behavior settings, and Preset chooses which effect the pad is actually running:
"Use the Setup button to show or hide the Setup panel, which controls how the XY pad behaves. Use the Preset field to select the effect you want to use in XYFX Mode."
Inside that Setup panel sit three knobs that shape how the pad responds to being touched and released, not the effect's own parameters directly:
"Use the Attack knob to set the length of the attack phase of the envelope, which is triggered when you touch the XY pad. In other words, this determines how long it takes the effect to fully respond to your touch. Use the Release knob to set the length of the release phase of the envelope, which is triggered when you release the XY pad. In other words, this determines how long it takes the effect to fully deactivate after you stop touching the XY pad. Use the Wet/Dry knob to set the blend the original signal (dry) and the effect signal (wet)."
Attack and Release are what keep a touch gesture from sounding like a hard on/off switch, a slow Attack eases the effect in as you land your finger, and a slow Release lets it trail off after you lift, rather than cutting the wet signal instantly. Last, the two axis labels themselves are effect-dependent rather than fixed:
"The X Axis and Y Axis fields show which parameters are controlled by each axis. This varies depending on the effect you are using."
Akai's manual doesn't publish a master table mapping every loadable effect to its own specific X/Y parameter pair, so treat the exact assignment for any given Preset as something to read off the X Axis and Y Axis fields on the hardware itself, not something to assume from the effect's name alone.
Not to be confused with: TouchFX
One naming trap worth flagging before it causes confusion: Akai's own Effects overview names a separate, differently-scoped feature in the same breath as XYFX, called TouchFX.
"Finally, there is a special effect type called TouchFX, which is specially designed for use the touch strip controller on MPC Key 61, but can be used on any MPC hardware and controlled using the onscreen touch slider or an external MIDI device."
TouchFX is built around the MPC Key 61's dedicated touch strip, a one-dimensional slider, not the two-dimensional XY pad this article covers, and it's documented separately in the manual's own Touch Strip chapter. The two share a naming pattern and a live-performance-effect concept, but they are not the same feature, and this article doesn't cover TouchFX's own controls.
Common mistakes
Mistake: expecting XYFX to layer on top of your existing four insert effects. It's an insert effect itself and needs its own slot. With four already loaded, clear one first.
Mistake: looking for a submix option in the Location field. XYFX's own Location field only offers Track, Output 1/2, or Output 3/4, unlike the general insert-effect system which also supports pads, keygroups, and submixes.
Mistake: assuming the same shortcut works across every Key-series unit. The Key 37 G2 uses Shift and Arrange/XYFX, while the plain Key 61 and Key 37 use Shift and Edit/XYFX, a real, documented difference between otherwise similarly-named hardware.
Mistake: confusing XYFX with TouchFX because both are live-performance effect features. TouchFX runs off the Key 61's one-dimensional touch strip (or an onscreen/MIDI substitute on other hardware); XYFX runs off the two-dimensional touchscreen pad. Different chapters, different controls.
A note on manual versions
Every technical claim above is checked directly against Akai's Standalone OS User Guide, Manual Version 3.9, cross-checked against Manual Version 3.7. The XYFX chapter itself holds a flat five-page offset between versions, opening on page 151 in v3.9 and page 146 in v3.7, with the touch/marker/Latch content landing on page 152 in v3.9 (page 147 in v3.7) and the Attack/Release/Wet-Dry knobs on page 153 (page 148 in v3.7), each page individually confirmed via direct single-page extraction rather than assumed to hold from one flat-offset finding elsewhere in the manual. The one real content difference between versions sits inside the entry-method bullet list itself: v3.7's hardware shortcuts cover MPC X, MPC Live II, MPC One, and MPC Key 61/Key 37 only, while v3.9 adds MPC One G2 and MPC Key 37 G2 to that same list, both devices that postdate the earlier manual. The Effects overview chapter's own cross-reference to XYFX, quoted above from page 88 in v3.9, is word-for-word identical in v3.7's own Effects Overview section, confirmed by direct comparison, so that framing of XYFX as a single insert effect rather than a standalone mode isn't a recent addition, it's held across both manual versions checked for this article.
Verdict
VERDICT
Want a two-parameter effect you can bend live with one finger: load XYFX into an open insert slot, set Location, pick a Preset, and touch the pad. Want it to hold a position without a finger on the glass: tap Latch while touching. Want it applied to a whole stereo bus rather than one track: set Location to Output 1/2 or Output 3/4, there's no submix option. Out of insert slots: clear one first, XYFX doesn't get a free pass around the four-slot limit. And if what you actually want is a one-dimensional touch-strip effect on an MPC Key 61, that's TouchFX, a different feature entirely.
Found a Preset with an X/Y pairing worth calling out, or a Latch trick worth sharing? Tell us what happened.